Posts

Showing posts from 2010

show and hide text in texbox

jQuery(document).ready(function(){ jQuery('#search').focus(function(){ if(this.value=='Search fonts to Download...') { this.value='' } }); jQuery('#search').blur(function(){ if(this.value=='') { this.value='Search fonts to Download...' } }); });

Breadcrumbs in wordpress

global $post; // if outside the loop if (is_page() && $post->post_parent) { $parent_title = get_the_title($post->post_parent); echo ' » ' . $parent_title . ' » '; wp_title(''); } else if (is_page()) { echo ' » '; wp_title(''); } else { }

Display title of parent & sub page

global $post; if($post->post_parent) { $parent_title = get_the_title($post->post_parent); echo $parent_title; } else { wp_title(''); }

How to Add the Parent Category as a Class in body_class()

<?php $class=''; /* Make it void by default */ if ( is_single() || is_category() ) { /* Only do this if we're on a single post or category page */ $category = get_the_category(); $parent = $category[0]->category_parent; $class = get_cat_name($parent); /* assign the permalink name for the parent category to the object $class */ }?> <body <?php body_class($class); /* This will add our custom class, which is void if we aren't on a single post or category page */ ?>>

How to add span tag into page navigation

<?php echo preg_replace ( '@\<li([^>]*)>\<a([^>]*)>(.*?)\<\/a>@i' , '<li$1><a$2><span>$3</span></a>' , wp_list_pages ( 'echo=0&orderby=id&title_li=&depth=1' ) ) ; ?>

remove default feed in wordpress

go to edit wp-includes/feed.php function get_default_feed() { //return apply_filters('default_feed', 'rss2'); }

how to add odd/even loop in array

1. ount the loop number for($i=0;$i<$blah;$i++) if($i&1){ // ODD }else{ // EVEN } 2. odd loop itteration $oddLoop = false; foreach ($findposts as $findpost): //..... if($oddLoop=!$oddLoop){ // code for odd loop numbers }else{ // code for even loop numbers } 3. Odd ID number if ( ( $findpost->ID ) != $id ) { if($findpost->ID & 1){ // ODD }else{ //EVEN } The three ways are 1. Modulo for ( $i = 0 ; $i < 10 ; $i ++) {   if ( $i % 2 == 0 )   {     echo "even" ;   }   else   {     echo "odd" ;   } } 2. Flipping boolean value $even = true ; for ( $i = 0 ; $i < 10 ; $i ++) {   if ( $even )   {     echo "even" ;   }   else   {     echo "odd" ;   }   $even = ! $even ; } 3. mentioned boolean operator for ( $i = 0 ; $i < 10 ; $i ++) {   if ( $i & 1 == 0 )   {     echo "even" ;   }   else   {     echo "odd" ;   } }

Add custom CSS classes to the wysiwyg drop-down

function ses_tinymce_css($wp) { $wp .= ',' . get_bloginfo('stylesheet_url'); return $wp; } add_filter( 'mce_css', 'ses_tinymce_css' ); or add_filter('mce_css', 'plugin_mce_css'); function plugin_mce_css() { return plugins_url().'/plugin/customTinyMCE.css'; }

Add Favicon on WordPress Blog

There are several ways to add favicon on WordPress blog 1.code on the header <link rel="shortcut icon" href=" /favicon.ico" /> <link rel="icon" type="image/png" href=" /favicon.ico"> 2. using WordPress Hook function add_theme_favicon() { ?> <link rel="shortcut icon" href=" /images/favicon.ico" > <?php } add_action('wp_head', 'add_theme_favicon');

Disable links Via jQuery

< script > $ ( function ( ) { //grab all a tags $ ( 'a' ) . each ( function ( ) { //click on a link.... $ ( this ) . click ( function ( ) { alert ( $ ( this ) . attr ( 'href' ) + ' is not available' ) ; //disable link return   false ; } ) ; } ) ; } ) ; </ script >

PHP pagination class

[PHP] class pagination { public function __construct() { } public function calculate_pages(&$total_rows, $rows_per_page, &$page_num) { $arr = array(); // calculate last page $last_page = ceil($total_rows / $rows_per_page); // make sure we are within limits $page_num = (int) $page_num; if ($page_num < 1) { $page_num = 1; } elseif ($page_num > $last_page) { $page_num = $last_page; } $upto = ($page_num - 1) * $rows_per_page; $arr['limit'] = 'LIMIT '.$upto.',' .$rows_per_page; $arr['current'] = $page_num; if ($page_num == 1) $arr['previous'] = $page_num; else $arr['previous'] = $page_num - 1; if ($page_num == $last_page) $arr['next'] = $last_page; else $arr['next'] = $page_num + 1; $arr['last'] = $last_page; $arr['info'] = 'Page ('.$page_num.' of '.$last_page.')'; $arr['pages'] = $this->get_surr

Display random image

[PHP] # Init Array $files = array(); # Get Folder if($_GET['folder']) { $folder = $_GET['folder']; } else { # Set Default Folder $folder = '/img/'; } # Set Full Path $path = $_SERVER['DOCUMENT_ROOT'] . '/' . $folder; # Open Directory if($handle = opendir($path)) { # Loop Through Directory while(false !== ($file = readdir($handle))) { if ($file != "." && $file != "..") { if(substr($file, -3) == 'gif' || substr($file, -3) == 'png' || substr($file, -3) == 'jpg' || substr($file, -4) == 'jpeg') $files[count($files)] = $file; } } } # Close Handle closedir($handle); # Init Random $rand = rand(0, count($files)-1); # Check Header Type # GIF if(substr($files[$random], -3) == 'gif') header("Content-type: image/gif"); # JPEG elseif(substr($files[$random], -3) == 'jpg') header("Content-type: image/jpeg"); elseif(substr($files[$rando

Get text height, width

define ( "F_SIZE" ,   8 ) ; define ( "F_FONT" ,   "arial.ttf" ) ;     function  get_bbox ( $text ) {   return   imagettfbbox ( F_SIZE ,   0 ,  F_FONT ,   $text ) ;   }   function  text_height  ( $text )   {   $box   =  get_bbox ( $text ) ;   $height   =   $box [ 3 ]   -   $box [ 5 ] ;   return   $height ;   }   function  text_width  ( $text )   {   $box   =  get_bbox ( $text ) ;   $width   =   $box [ 4 ]   -   $box [ 6 ] ;   return   $width ;   }

Text Resizing With jQuery

$(document).ready(function(){ // Reset Font Size var originalFontSize = $('html').css('font-size'); $(".resetFont").click(function(){ $('html').css('font-size', originalFontSize); }); // Increase Font Size $(".increaseFont").click(function(){ var currentFontSize = $('html').css('font-size'); var currentFontSizeNum = parseFloat(currentFontSize, 10); var newFontSize = currentFontSizeNum*1.2; $('html').css('font-size', newFontSize); return false; }); // Decrease Font Size $(".decreaseFont").click(function(){ var currentFontSize = $('html').css('font-size'); var currentFontSizeNum = parseFloat(currentFontSize, 10); var newFontSize = currentFontSizeNum*0.8; $('html').css('font-size', newFontSize); return false; }); });

Display 5 latest posts in each category in WordPress

<div id="page-not-found" class="post-page"> <?php $cat_args = array( 'orderby' => 'name', 'order' => 'ASC', 'child_of' => 0 ); $categories = get_categories($cat_args); foreach($categories as $category) { echo '<dl>'; echo '<dt> <a href="' . get_category_link( $category->term_id ) . '" title="' . sprintf( __( "View all posts in %s" ), $category->name ) . '" ' . '>' . $category->name.'</a></dt>'; $post_args = array( 'numberposts' => 5, 'category' => $category->term_id ); $posts = get_posts($post_args); foreach($posts as $post) { ?> <dd><a href="<?php the_permalink(); ?>"><?php the_title(); ?></a></dd> } echo '<dd class="view-all"> <a href="' . g

display the_content with setup_postdata

<?php global $more; $cat= 3; $posts = get_posts ("cat=$cat&showposts=5"); if ($posts) { foreach ($posts as $post): $more = false; setup_postdata($post); ?> <h3 class="storytitle"><a href="<?php the_permalink() ?>" rel="bookmark"><?php the_title(); ?></a></h3> <p class="storycontent"><?php the_content('Read more...'); ?></p> <?php endforeach; $more = true; } ?>

Show future posts on single post

today i show how to display future posts in single.php. you just copy code below into funciton.php. add_filter('the_posts', 'show_future_posts'); function show_future_posts($posts) { global $wp_query, $wpdb; if(is_single() && $wp_query->post_count == 0) { $posts = $wpdb->get_results($wp_query->request); } return $posts; }

Displaying Future Posts in WordPress

If you do like I do and schedule posts ahead of time (especially on the podcast), there’s a way inside of WordPress to show your readers what posts are coming up next: <?php $my_query = new WP_Query('post_status=future&order=DESC&showposts=5'); if ($my_query->have_posts()) { while ($my_query->have_posts()) : $my_query->the_post(); ?> <?php the_date(); ?> - <?php the_title(); ?> <?php endwhile; } ?> This will display up to 5 “scheduled” posts wherever you drop in the code. Add a headline <h2> tag if you want to give it a title (should you want to use it as a widget). Want to see this code in action? Check the WordPulse podcast page‘s sidebar to see it working!

Display a List of Upcoming Posts in WordPress

When you have completed a post in WordPress, you have the ability to save it as a draft, publish it immediately or schedule a future date when it will be published automatically. This is extremely helpful if you want to plan ahead or if you use your WP site for events. Creating a simple list of upcoming posts lets your visitors know what they can look forward to and is pretty simple to do. The following code can be placed in your sidebar on within any template. <?php $futurePosts = new WP_Query ( ) ; $futurePosts -> query ( 'showposts=5&post_status=future&order=ASC' ) ; if ( $futurePosts -> have_posts ( ) ) : while ( $futurePosts -> have_posts ( ) ) : ?> <ul> <li> <?php the_title ( ) ; ?> <br /><small> <?php the_time ( get_option ( 'date_format' ) ; ?> </small></li> </ul> <?php endwhile ; else : ?> <ul> <li>No upcoming events.</li> </ul> <?php en

unknow error occurred (0xE8008001)

today i show you how to fixed unknow error occurred (0xE8008001) when you jailbreak ipod http://thy4u.blogspot.com/2010/06/how-to-jailbreak-your-iphone-with.html

How to jailbreak your Ipod with BlackRa1n RC3

Image
Step 1: Update iTunes to the latest version available and reboot your computer. Step 2: Download BlackRa1n RC3 from our iPhone downloads page and install it, then reboot your computer. Step 3: Plug your iPhone in your computer and launch BlackRa1n RC3. Click on "make it ra1n" Step 4: Your iPhone will enter recovery mode. The regular recovery mode image on your iPhone will be replaced by a picture of GeoHot (same as image above). Step 5: BlackRa1n will run on your iPhone and then it will reboot. A pop up will show up asking you to donate. If you successfully jailbreak your iPhone, I suggest you send $5 or $10 to GeoHot. Step 6: Once your iPhone reboots, you will have a new icon on your springboard. This is BlackRa1n. Now make sure you have internet connection and launch BlackRa1n on your iPhone. Step 7: Choose what installer applications you want to install on your iPhone and then tap “Install”. I suggest only installing Cydia but you may install them all if you want to. Black

String Search & Replace (AS2 & AS3)

function strReplace($str:String, $search:String, $replace:String):String { return $str.split($search).join($replace); } var str:String = new String(); str = "we are Khmer!" trace(strReplace(str,"we","We")); The "split" function splits the string at the word ($search) you're searching for. And the "join" inserts the new word ($replace) between the elements, concatenates them, and returns the resulting string

Wordpress get Page content By Page ID

<?php if(!function_exists('getPageContent')) { function getPageContent($pageId,$max_char) { if(!is_numeric($pageId)) { return; } global $wpdb; $nsquery = 'SELECT DISTINCT * FROM ' . $wpdb->posts . ' WHERE ' . $wpdb->posts . '.ID=' . $pageId; $post_data = $wpdb->get_results($nsquery); if(!empty($post_data)) { foreach($post_data as $post) { $text_out=nl2br($post->post_content); $text_out=str_replace(']]>', ']]>', $text_out); $text_out = strip_tags($text_out); return substr($text_out,0,$max_char); } } } } ?> How to Call function getPageContent? <?php echo getPageContent(11,150); //First parameter is PAGE ID and second is number of words displayed. ?>

Limit the Number of Characters in a Textarea or Text Field

removing link outline around

Some browser when you click on link text or link image you always see outline box around text or image link. a, object { outline: none; }

safari disable resize textarea

You can use the CSS3 'resize' property to "specify whether or not an element is resizable by the user": textarea { resize:none; } or you can use textarea { max-width: 175px; /* RESTRICT SAFARI RESIZE */ max-height: 250px; /* RESTRICT SAFARI RESIZE */ }

Wordpress get page title by page id.

Get page content by page id Wordpress

I have written a function and now I can fetch the content of any page or one more pages just by the page id. <?php if(!function_exists('getPageContent')) { function getPageContent($pageId) { if(!is_numeric($pageId)) { return; } global $wpdb; $sql_query = 'SELECT DISTINCT * FROM ' . $wpdb->posts . ' WHERE ' . $wpdb->posts . '.ID=' . $pageId; $posts = $wpdb->get_results($sql_query); if(!empty($posts)) { foreach($posts as $post) { return nl2br($post->post_content); } } } } ?> For exampe, <?php echo getPageContent(6); ?>

Get page content by page id Wordpress

Get file extension

function file_get_ext(filename) { return typeof filename != "undefined" ? filename.substring(filename.lastIndexOf(".")+1, filename.length).toLowerCase() : false; }

How To Remove the White Space in wp_list_pages

Image
The Problem The wp_list_pages() generates either a series of elements containing links to all of you blog’s pages, or a full unordered list with a heading at the beginning. The output of this list looks like this: <ul> <li><a href="#">Page name</a></li> <li><a href="#">Page name</a></li> </ul> While some browsers don’t have a problem with elements being generated on new lines, in some, this method causes a white space to show up in front of each list item. This space becomes visible and annoying when trying to create a horizontal menu with background colors and equal horizontal spacing. The Fix To get rid of the white space, your output would need to look like this: <ul><li><a href="#">Page name</a></li><li><a href="#">Page name</a></li></ul> This can be achieved by using a small PHP function that will take the code generated b

Check validate HTML and CSS

http://jigsaw.w3.org/css-validator/#validate_by_uri http://validator.w3.org/check?verbose=1&uri=http://thy4u.blogspot.com

Array Max

<html> <head> <title>Array Max</title> <script type="text/javascript"> // From: http://codingforums.com/showthread.php?t=152260 var v=[10,8,42,50] // So looking to find 50 function srchMaxV() { var maxV = 0; // or value smaller that smallest in array to search, like = -1000; for (i=0; i if (v[i] > maxV) { maxV = v[i]; } } return maxV; } function NumSort(a,b) { return a-b; } // required for sorting numbers only function sortMaxV() { var sortedV = new Array(); sortedV = v.sort(NumSort); alert('Max: '+sortedV[sortedV.length-1]+'\nMin: '+sortedV[0]); } </script> </head> <body> <button onclick="alert('Max: '+srchMaxV())">Search for Max <button onclick="sortMaxV()">Sort for Max/Min </body> </html>

Image watermark with PHP

Image
Steps: 1. Load both images 2. Get size of both images 3. Copy watermark to main image 4. Print image to screen PHP functions: imagecreatefromgif imagecreatefromjpeg getimagesize imagecopymerge header imagejpeg imagedestroy Watermark image: Main image: <?php $main_img = "Happy_valentines_day.jpg"; // main big photo / picture $watermark_img = "watermark.gif"; // use GIF or PNG, JPEG has no tranparency support $padding = 3; // distance to border in pixels for watermark image $opacity = 100; // image opacity for transparent watermark $watermark = imagecreatefromgif($watermark_img); // create watermark $image = imagecreatefromjpeg($main_img); // create main graphic if(!$image || !$watermark) die("Error: main image or watermark could not be loaded!"); $watermark_size = getimagesize($watermark_img); $watermark_width = $watermark_size[0]; $watermark_height = $watermark_size[1]; $image_size = getimagesize($main_img); $dest_x = $imag

Check password safety with JavaScript while typing

<script language="javascript"> function check_password_safety(pwd){ var msg = ""; var points = pwd.length; var password_info = document.getElementById('password_info'); var has_letter = new RegExp("[a-z]"); var has_caps = new RegExp("[A-Z]"); var has_numbers = new RegExp("[0-9]"); var has_symbols = new RegExp("\\W"); if(has_letter.test(pwd)) { points += 4; } if(has_caps.test(pwd)) { points += 4; } if(has_numbers.test(pwd)) { points += 4; } if(has_symbols.test(pwd)) { points += 4; } if( points >= 24 ) { msg = ' Your password is strong! '; } else if( points >= 16 ) { msg = ' Your password is medium! '; } else if( points >= 12 ) { msg = ' Your password is weak! '; } else { msg = ' Your password is very weak! '; } password_info.innerHTML = msg ; } </script> <input type="text" name="pwd" id="pwd" size="20" onkeyup=&q

How to Send Email from a PHP Script Using SMTP Authentication

require_once "Mail.php"; $from = "Sandra Sender "; $to = "Ramona Recipient "; $subject = "Hi!"; $body = "Hi,\n\nHow are you?"; $host = "mail.example.com"; $username = "smtp_username"; $password = "smtp_password"; $headers = array ('From' => $from, 'To' => $to, 'Subject' => $subject); $smtp = Mail::factory('smtp', array ('host' => $host, 'auth' => true, 'username' => $username, 'password' => $password)); $mail = $smtp->send($to, $headers, $body); if (PEAR::isError($mail)) { echo(" " . $mail->getMessage() . " "); } else { echo(" Message successfully sent! "); } ?>

Standard module chrome styles

From Joomla! Documentation none . Output the raw Module content with no wrapping. table . Output the module in a table. horz . Output the module as a table inside an outer table. xhtml . Output the module wrapped in div tags. rounded . Output the module wrapped in nested div tags to support rounded corners. outline . Output the module wrapped with a preview border.

Applying custom module chrome

From Joomla! Documentation To define custom Module chrome in your template you need to create a file called modules.php in your template html directory. For example, this might be PATH_TO_JOOMLA/templates/TEMPLATE_NAME/html/modules.php. In this file you should define a function called modChrome_STYLE where 'STYLE' is the name of your custom Module chrome. This function will take three arguments, $module, &$params, and &$attribs, as shown: <?php function modChrome_STYLE ( $module , & $params , & $attribs ) { /* chromed Module output goes here */ } ?> Custom chrome attributes It is also possible to pass further attributes into the Module chrome function using the same statement that sets the Module chrome. These additional attributes can be anything you like, and are stored in the $attribs array. Take the following example Module chrome function: <?php function modChrome_custom ( $module , & $params , & $attribs ) { if (

Convert to ico format using free online sites

http://converticon.com/ http://www.favicongenerator.com/ http://www.htmlkit.com/services/favicon/ http://tools.dynamicdrive.com/favicon/ http://www.favicon.cc/

Customize Your Profile Widget

Put your updates anywhere or create a live stream for an event. Compatible with Facebook, MySpace, Blogger etc. http://twitter.com/goodies/widget_profile?

Customize Your Profile Widget

Put your updates anywhere or create a live stream for an event. Compatible with Facebook, MySpace, Blogger etc. http://twitter.com/goodies/widget_profile?

The History of Valentine s Day

Image
How did February 14 become a day for romance? Legend has it that during the third century, Valentine, who was a devout Christian, would perform marriages for young couples. Emperor Claudius II, however, banned marriage because he did not want young men getting married. He believed that single young men made better soldiers than men who were married; therefore he did not want his potential crop of soldiers to be depleted. Valentine defied Claudius ban on marriage and continued to perform marriages for young couples in secret. Once Claudius discovered what Valentine was doing, he ordered him put to death. While Valentine was in jail awaiting his death, he left a goodbye note to a young girl who he was in love with. He signed the note, "From your Valentine," words that are often used today on Valentine s Day cards. It is widely believed that the young girl Valentine was in love with was also the daughter of Claudius. Valentine was put to death on February 14, 269 AD. Later, in 4

joomla step by step

Show/Hide Text in Textbox

<input type="text" name="search" class="form1" onblur="if (this.value == '') {this.value = 'thy4u.blogspot.com';}" onfocus="if (this.value == 'thy4u.blogspot.com') {this.value = '';}" value="thy4u.blogspot.com" />

Popup Window

Joomla! 1.5.15 Released - Get It While It's Hot!

The Joomla! Project announced the release of Joomla! 1.5.15 today . This release contains a couple of security fixes, so be sure and upgrade as soon as possible.

Get the browser width and height in internet explorer

<script type=”text/javascript”> w = 0; h = 0; w = document.documentElement.clientWidth; h = document.documentElement.clientHeight; alert("w: " + w + ", h: " + h); </script>

Removing “Welcome To The Frontpage” In Joomla

Image
The setting for the Page Title is located in the parameters of each Menu Item under "Parameters (System)". For Example to change the Page Title for the Home page of the Sample web site, you would navigate to Menus / Main Menu, click on "Home" to open the Menu Item:[Edit] screen. Then click on "Parameters (System)" to show the System Parameters, and either change the "Page Title" parameter or set "Show Page Title" to "No".

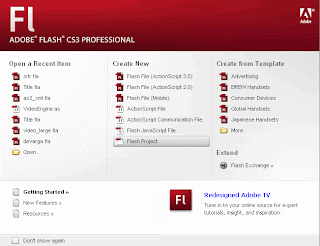
Creating Flash Projects

Image
Flash makes it easy for you to create a project. When you open Flash, one of your first options is to create a Flash project. Under the central Create New selection, you’ll want to choose the final option, Flash Project. Select Flash Project to create a new project. The New Project window opens and asks you for a name and location for you new project file (the extension to all Flash projects is FLP). After you’ve created your project file, a new window—called the Project window—opens to list all of the files in your project. What you now have is an empty project folder. At this point, all you have to do is add your folders and files.

Working With Text: Embedding Fonts

Image
By default, Static text embeds the font outlines of this text so that it looks the same in your Web browser. Dynamic and Input text do not. If the user does not have the font on his computer, the text will look like error. Font embedding is managed in the Properties Inspector for any Dynamic or Input text. In the following image, I’ve selected a Dynamic text block from the Stage and highlighted the Properties for it. You’ll see a button on the right side labeled "Embed..." Selecting the Embed... button opens the Character Embedding window:

Embedding fonts in AS3

I love this! ... library, be-gone! package { import flash.util.describeType; import flash.display.MovieClip; import flash.display.TextField; import flash.text.TextFormat; import flash.text.AntiAliasType; public class Test extends MovieClip { // be sure this is pointing to a ttf font in your hardrive [Embed(source="C:\WINDOWS\Fonts\somefont.ttf", fontFamily="foo")] public var bar:String; public function Test() { var format:TextFormat = new TextFormat(); format.font = "foo"; format.color = 0xFFFFFF; format.size = 130; var label:TextField = new TextField(); label.embedFonts = true; label.autoSize = TextFieldAutoSize.LEFT; label.antiAliasType = AntiAliasType.ADVANCED; label.defaultTextFormat = format; label.tex

Loading XML data using ActionScript 3.0

Image
Using XML is one of the best ways for structuring external content in a logical format that is easy to understand, process, and update. This tutorial will teach you the basics on how to load and process XML in Flash using ActionScript 3.0. You are assumed to have basic knowledge of ActionScript in order to follow this tutorial. Here is sample code loading XML in ActionScript 3 Here is sample XML code Download here

Retrieve Flash Variables in Actionscript 3

Image
In Actionscript 3 variables that are passed in through query string have been moved to the parameters property of LoaderInfo instance. Here’s a real simple way to retrieve flash variable in Actionscript 3 1. To access the query string fileName in Actionscript 3 , all you have to do in your actionscript 3 source code is 2. Here Html Code access Flash variables Download here

Open new window in WSS

today i testing Open New Window in Quick launch WSS Navigation. javascript:window.open('http:// www.google.com','_blank');history.go(0);

Custom Welcome User message in SharePoint

Image
Default Setting SharePoint display Logged-in user name as Welcome UserName. I have create Custom UserControl (name CustomWelcomeUser.ascx) 1. Go go C:\Program Files\Common Files\Microsoft Shared\web server extensions\12\TEMPLATE\CONTROLTEMPLATES then create new folder name "CustomWelcome" 2. Go go CustomWelcome then create New Custom UserControl name "CustomWelcomeUser.ascx"